外部補助記憶装置について
調べたことを雑多にまとめるためのブログ。 内容の誤り等から生じるいかなる損害について、当ブログ管理者は一切の責任を負わない。
Hyper-V 仮想スイッチで NAT する方法
これに従って操作する
PS C:\WINDOWS\system32> New-VMSwitch -SwitchName Proxmox -SwitchType Internal
Name    SwitchType NetAdapterInterfaceDescription
----    ---------- ------------------------------
Proxmox Internal

PS C:\WINDOWS\system32> Get-NetAdapter
Name                      InterfaceDescription                    ifIndex Status       MacAddress             LinkSpeed
----                      --------------------                    ------- ------       ----------             ---------
...
vEthernet (Proxmox)       Hyper-V Virtual Ethernet Adapter #3          60 Up           00-15-5D-01-EA-01        10 Gbps

PS C:\WINDOWS\system32> New-NetIPAddress -InterfaceIndex 60 -IPAddress 172.16.96.1 -PrefixLength 24
IPAddress         : 172.16.96.1
InterfaceIndex    : 60
InterfaceAlias    : vEthernet (Proxmox)
AddressFamily     : IPv4
Type              : Unicast
PrefixLength      : 24
PrefixOrigin      : Manual
SuffixOrigin      : Manual
AddressState      : Tentative
ValidLifetime     :
PreferredLifetime :
SkipAsSource      : False
PolicyStore       : ActiveStore

IPAddress         : 172.16.96.1
InterfaceIndex    : 60
InterfaceAlias    : vEthernet (Proxmox)
AddressFamily     : IPv4
Type              : Unicast
PrefixLength      : 24
PrefixOrigin      : Manual
SuffixOrigin      : Manual
AddressState      : Invalid
ValidLifetime     :
PreferredLifetime :
SkipAsSource      : False
PolicyStore       : PersistentStore


PS C:\WINDOWS\system32> New-NetNAt -Name ProxmoxNAT -InternalIPInterfaceAddressPrefix 172.16.96.0/24
Name                             : ProxmoxNAT
ExternalIPInterfaceAddressPrefix :
InternalIPInterfaceAddressPrefix : 172.16.96.0/24
IcmpQueryTimeout                 : 30
TcpEstablishedConnectionTimeout  : 1800
TcpTransientConnectionTimeout    : 120
TcpFilteringBehavior             : AddressDependentFiltering
UdpFilteringBehavior             : AddressDependentFiltering
UdpIdleSessionTimeout            : 120
UdpInboundRefresh                : False
Store                            : Local
Active                           : True
AArch64 な環境を x86_64 マシン上に cloud-init で自動で構築する
テスト用に aarch64 な環境が欲しいが手元に aarch64 ネイティブな環境がなかったため、QEMU のエミュレーションを用いた仮想マシンで cloud-init を使って自動で環境を構築したときのメモ
依存パッケージのインストール
virsh や virt-install、cloud-localds を利用するため必要なパッケージをインストールしておく。
sudo apt install virtinst libvirt-system-daemon qemu-system-aarch64 cloud-image-utils
cloud-init による自動インストール
SSH サーバーの設定と SSH 鍵を事前に登録しておき、パスワードなしでログインできるようにしておく。 ネットワークはブリッジ等の設定が面倒なため、QEMU のユーザースペースネットワーク機能とポートフォワードを利用している。
#!/bin/bash

set -eux

rm -f key key.pub
ssh-keygen -t ed25519 -f $(pwd)/key -N ""
PUB_KEY=$(cat key.pub)

HOSTNAME="aarch64-test"
USER="test"

cat << EOF > user-data.yaml
#cloud-config
hostname: $HOSTNAME
user: $USER
password: $USER
chpasswd: { expire: False }
ssh_pwauth: True
package_upgrade: true
packages:
  - openssh-server

runcmd:
  - mkdir /home/$USER/.ssh
  - echo $PUB_KEY > /home/$USER/.ssh/authorized_keys
  - systemctl enable sshd
  - poweroff

disk_setup:
  /dev/vdb:
    table_type: 'mbr'
    layout:
      - [100,82]
    overwrite: False
EOF

cat << EOF > network.yaml
EOF

cloud-localds user-data.img user-data.yaml --network-config network.yaml

IMAGE_NAME="image.img"
if [ ! -e noble-server-cloudimg-arm64.img ]; then
    wget https://cloud-images.ubuntu.com/noble/current/noble-server-cloudimg-arm64.img
fi
cp noble-server-cloudimg-arm64.img $IMAGE_NAME
qemu-img resize $IMAGE_NAME 20G

virt-install \
    --name $HOSTNAME --ram 4096 --arch aarch64 --vcpus 4 \
    --os-variant ubuntu22.04 \
    --disk path=$IMAGE_NAME \
    --disk path=user-data.img \
    --tpm none \
    --network type=user,model=virtio \
    --graphics none --serial pty --console pty \
    --import


virsh start $HOSTNAME
virsh qemu-monitor-command --hmp $HOSTNAME 'hostfwd_add ::10022-:22'
上記スクリプトを実行すると、セットアップと再起動後のポートフォワードの設定が自動で行われる。 セットアップ後に自動で何かを実行する場合は、以下のように再起動を待機するようにしておけばよい。
#!/bin/bash

SSH="ssh -p 10022 -i key -o UserKnownHostsFile=/dev/null -o StrictHostKeyChecking=no test@localhost"

$SSH exit
RESULT=$?
until [ $RESULT -eq 0 ]; do
   echo "retrying..."
   $SSH exit
   RESULT=$?
   sleep 1
done
Vector AES (VAES) で AES-GCM の処理が速くなるらしい
より簡潔な VAES 実装のパッチが Linux kernel に投げられていた。
VAES のパッチ自体は過去に存在していたが、Intel が開発したパッチなためか再利用性に欠け、バイナリサイズも大きいという欠点があったようだ。
今回はそれを鑑みて、簡潔な実装となるようにしたらしい
I wrote the new AES-GCM assembly code from scratch, focusing on correctness, performance, code size (both source and binary), and documenting the source. The new assembly file aes-gcm-avx10-x86_64.S is about 1200 lines including extensive comments, and it generates less than 8 KB of binary code. The main loop does 4 vectors at a time, with the AES and GHASH instructions interleaved. Any remainder is handled using a simple 1 vector at a time loop, with masking.
aes-gcm-avx10-x86_64.S を簡単に見た限り、コメントも充実していて比較的読みやすそうである。
ちなみに、Boring SSL でも Cloudflare による VAES のパッチが入っている。
https://boringssl-review.googlesource.com/c/boringssl/+/65987/3
性能としては、Intel の最新プロセッサで1.5倍程度の改善があるようだ。
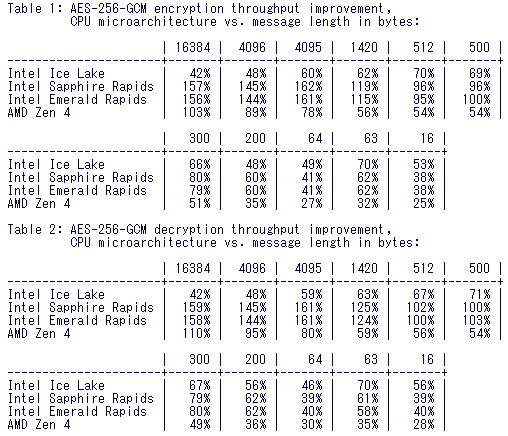
他の実装と比較しても、ほぼ同等か僅かに高速という結果が得られている。
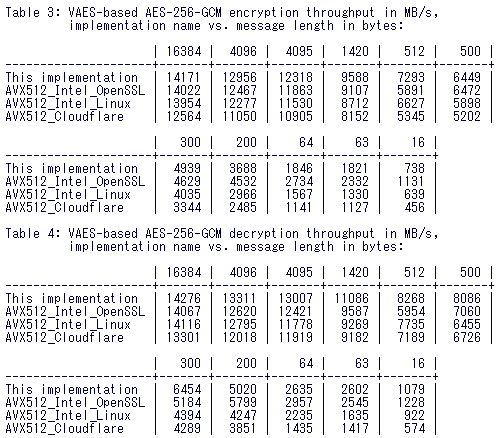
Linux kernel に入ればkTLS やストレージ暗号化などにおいて利用の幅が広がりそうである。
Nightly な Rust における VSCode rust-analyzer のエラー対応
Nightly な rust の環境で VSCode rust-analyzer が動作しなかった問題を解決した。
エラーの内容
2024-07-25T04:28:29.396404Z ERROR FetchBuildDataError:
error: the `--keep-going` flag is unstable, pass `-Z unstable-options` to enable it
See https://github.com/rust-lang/cargo/issues/10496 for more information about the `--keep-going` flag.


2024-07-25T04:28:29.860266Z ERROR Flycheck failed to run the following command: CommandHandle { program: "/home/naoki/.cargo/bin/cargo", arguments: ["check", "--workspace", "--message-format=json-diagnostic-rendered-ansi", "--manifest-path", "/home/naoki/XXX/Cargo.toml", "--keep-going", "--all-targets"], current_dir: Some("/home/naoki/XXX") }, error=Cargo watcher failed, the command produced no valid metadata (exit code: ExitStatus(unix_wait_status(25856))):
error: the `--keep-going` flag is unstable, pass `-Z unstable-options` to enable it
See https://github.com/rust-lang/cargo/issues/10496 for more information about the `--keep-going` flag.

2024-07-25T04:28:30.269350Z ERROR Flycheck failed to run the following command: CommandHandle { program: "/home/naoki/.cargo/bin/cargo", arguments: ["check", "--workspace", "--message-format=json-diagnostic-rendered-ansi", "--manifest-path", "/home/naoki/XXX/Cargo.toml", "--keep-going", "--all-targets"], current_dir: Some("/home/naoki/XXX") }, error=Cargo watcher failed, the command produced no valid metadata (exit code: ExitStatus(unix_wait_status(25856))):
error: the `--keep-going` flag is unstable, pass `-Z unstable-options` to enable it
See https://github.com/rust-lang/cargo/issues/10496 for more information about the `--keep-going` flag.
rust-analyzer の Extra args で -Z unstable-options を指定して再起動すれば解決する。

ArchLinux で Kubernetes クラスタをセットアップする
ConohaVPS に ArchLinux をインストールし、Kubernetes をセットアップする。 ArchLinux インストールについては
Conoha VPS に ArchLinux をインストールする - 外部補助記憶装置
に書いた。
yay インストール
kubeadm や kubelet は AUR のパッケージであるため、AUR パッケージを扱うために yay をインストールしておく
$ sudo pacman -S git
$ git clone https://aur.archlinux.org/yay.git
$ cd yay
$ makepkg -si
コンテナランタイムインストール
ここでは containerd をコンテナランタイムとして用いる。
$ yay -Syyu
$ yay -S containerd
$ sudo systemctl enable --now containerd
kubeadm, kubelet インストール
kubeadm 等必要なパッケージをインストールしておく。
$ yay -S kubeadm-bin kubelet-bin kubectl-bin cni-plugins ebtables ethtool socat
$ sudo systemctl enable kubelet
kubeadm でクラスタセットアップ
カーネルモジュールのロード設定やIP forwarding 等の設定が必要なため、行っておく。
$ /etc/modules-load.d/k8s.conf
overlay
br_netfilter
$ sudo modprobe overlay
$ sudo modprobe br_netfilter
$ cat /etc/sysctl.d/k8s.conf
net.bridge.bridge-nf-call-iptables  = 1
net.bridge.bridge-nf-call-ip6tables = 1
net.ipv4.ip_forward                 = 1
$ sysctl -p /etc/sysctl.d/k8s.conf
containerd の cgroup ドライバを systemd に変更する
$ sudo mkdir -p /etc/containerd
$ sudo containerd config default | sudo tee /etc/containerd/config.toml
$ sudo vim /etc/containerd/config.toml
  [plugins."io.containerd.grpc.v1.cri".containerd.runtimes.runc.options]
    SystemdCgroup = true

$ sudo systemctl restart containerd
クラスタ向けのアドレスとして 192.168.20.2 を割り当てているため、これを advertise address として利用する。
また、1GB しかメモリがないため、メモリ不足に関する Warning を無視するフラグを立てている。
$ sudo kubeadm init --apiserver-advertise-address=192.168.20.2 --pod-network-cidr=10.244.0.0/16 --ignore-preflight-errors='Mem'
セットアップ後、トークンをメモし、kubectl に必要な config をコピーしておく。
$ mkdir -p $HOME/.kube
$ sudo cp -i /etc/kubernetes/admin.conf $HOME/.kube/config
$ sudo chown $(id -u):$(id -g) $HOME/.kube/config
control plane なノードにも Pod がスケジュールされるように taint を解除しておく。
$ kubectl taint nodes --all node-role.kubernetes.io/control-plane-
node/conoha-2 untainted
CNI プラグインのセットアップ
今回は Pod 間通信のために Flannel を用いる。
$ kubectl apply -f https://github.com/flannel-io/flannel/releases/latest/download/kube-flannel.yml
この時点で Node は Ready となっているはずである
$ kubectl get pods -A
NAMESPACE      NAME                               READY   STATUS    RESTARTS   AGE
kube-flannel   kube-flannel-ds-mprlm              1/1     Running   0          48s
kube-system    coredns-7db6d8ff4d-4fcvv           1/1     Running   0          3m35s
kube-system    coredns-7db6d8ff4d-d9dg9           1/1     Running   0          3m35s
kube-system    etcd-conoha-2                      1/1     Running   54         3m51s
kube-system    kube-apiserver-conoha-2            1/1     Running   52         3m51s
kube-system    kube-controller-manager-conoha-2   1/1     Running   53         3m51s
kube-system    kube-proxy-szvwb                   1/1     Running   0          3m36s
kube-system    kube-scheduler-conoha-2            1/1     Running   53         3m52s

$ kubectl get nodes
NAME       STATUS   ROLES           AGE     VERSION
conoha-2   Ready    control-plane   3m57s   v1.30.3
Worker ノードのセットアップ
同様の手順でコンテナランタイムや kubelet 等をインストールしておく。
byobu set-window-option synchronize-panes on を使うと楽になる。
セットアップ後、クラスタに参加させる。
$ sudo kubeadm join 192.168.20.2:6443 --token <token> --discovery-token-ca-cert-hash <hash>
参加後、クラスタを初期化したノードでチェックする。 正しくノードが参加できていることがわかる。
$ kubectl get nodes
NAME       STATUS   ROLES           AGE   VERSION
conoha-2   Ready    control-plane   10m   v1.30.3
conoha-3   Ready    <none>          28s   v1.30.3
conoha-4   Ready    <none>          28s   v1.30.3
conoha-5   Ready    <none>          29s   v1.30.3
archinstall で事前定義した構成ファイルを利用してインストール
複数台の ConohaVPS に ArchLinux をインストールするために、事前定義した構成を利用したいと思い試した。
1台目のインストール時に希望する構成を設定した後、"Save configuration" で構成ファイルを /root 等に保存しておく。
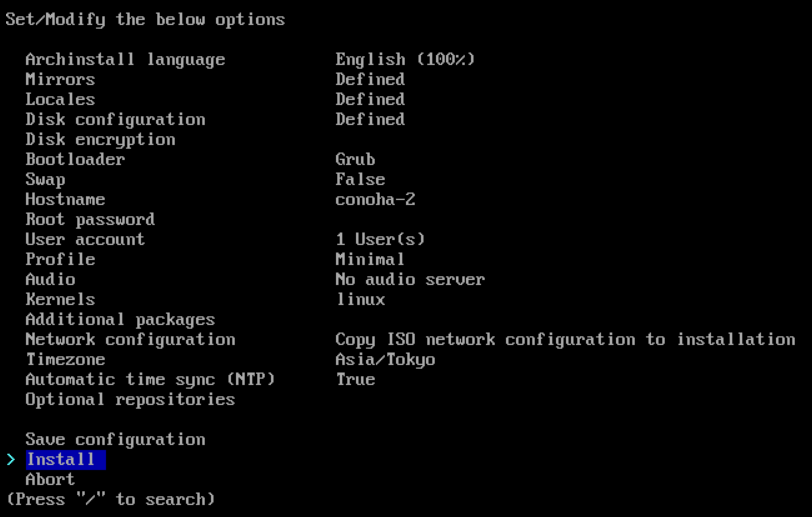
user_configuration.json という名前でこのようなファイルが得られる。
{
    "additional-repositories": [],
    "archinstall-language": "English",
    "bootloader": "Grub",
    "config_version": "2.8.1",
    "debug": false,
    "disk_config": {
        "config_type": "manual_partitioning",
        "device_modifications": [
            {
                "device": "/dev/vda",
                "partitions": [
                    {
                        "btrfs": [],
                        "dev_path": null,
                        "flags": [
                            "Boot"
                        ],
                        "fs_type": "fat32",
                        "mount_options": [],
                        "mountpoint": "/boot",
                        "obj_id": "44d1fa00-4c83-407f-abc4-c2a6f6073044",
                        "size": {
                            "sector_size": {
                                "unit": "B",
                                "value": 512
                            },
                            "unit": "MiB",
                            "value": 203
                        },
                        "start": {
                            "sector_size": {
                                "unit": "B",
                                "value": 512
                            },
                            "unit": "MiB",
                            "value": 3
                        },
                        "status": "create",
                        "type": "primary"
                    },
                    {
                        "btrfs": [],
                        "dev_path": null,
                        "flags": [],
                        "fs_type": "xfs",
                        "mount_options": [],
                        "mountpoint": "/",
                        "obj_id": "065e7a36-9c7a-4d3b-b875-adaa72bcd3a0",
                        "size": {
                            "sector_size": {
                                "unit": "B",
                                "value": 512
                            },
                            "unit": "B",
                            "value": 21258829824
                        },
                        "start": {
                            "sector_size": {
                                "unit": "B",
                                "value": 512
                            },
                            "unit": "sectors",
                            "value": 421888
                        },
                        "status": "create",
                        "type": "primary"
                    }
                ],
                "wipe": true
            }
        ]
    },
    "hostname": "conoha-2",
    "kernels": [
        "linux"
    ],
    "locale_config": {
        "kb_layout": "us",
        "sys_enc": "UTF-8",
        "sys_lang": "en_US"
    },
    "mirror_config": {
        "custom_mirrors": [],
        "mirror_regions": {
            "Japan": [
                "https://www.miraa.jp/archlinux/$repo/os/$arch",
                "https://repo.jing.rocks/archlinux/$repo/os/$arch",
                "https://mirrors.cat.net/archlinux/$repo/os/$arch",
                "https://jp.mirrors.cicku.me/archlinux/$repo/os/$arch",
                "https://ftp.jaist.ac.jp/pub/Linux/ArchLinux/$repo/os/$arch",
                "http://www.miraa.jp/archlinux/$repo/os/$arch",
                "http://repo.jing.rocks/archlinux/$repo/os/$arch",
                "http://mirrors.cat.net/archlinux/$repo/os/$arch",
                "http://jp.mirrors.cicku.me/archlinux/$repo/os/$arch",
                "http://ftp.tsukuba.wide.ad.jp/Linux/archlinux/$repo/os/$arch",
                "http://ftp.jaist.ac.jp/pub/Linux/ArchLinux/$repo/os/$arch"
            ]
        }
    },
    "network_config": {
        "type": "iso"
    },
    "no_pkg_lookups": false,
    "ntp": true,
    "offline": false,
    "packages": [
        "openssh",
        "vim"
    ],
    "parallel downloads": 0,
    "profile_config": {
        "gfx_driver": null,
        "greeter": null,
        "profile": {
            "custom_settings": {},
            "details": [],
            "main": "Minimal"
        }
    },
    "script": "guided",
    "silent": false,
    "skip_ntp": false,
    "skip_version_check": false,
    "swap": false,
    "timezone": "Asia/Tokyo",
    "uki": false,
    "version": "2.8.1"
}
インストール対象の VPS が到達可能な Web サーバーに配置し、取得できるようにしておく。 インストール対象の VPS で
archinstall --config https://XXXXX/config.json
を実行する。
ディスクレイアウト等がすでに設定された状態の archinstall が立ち上がってくる。
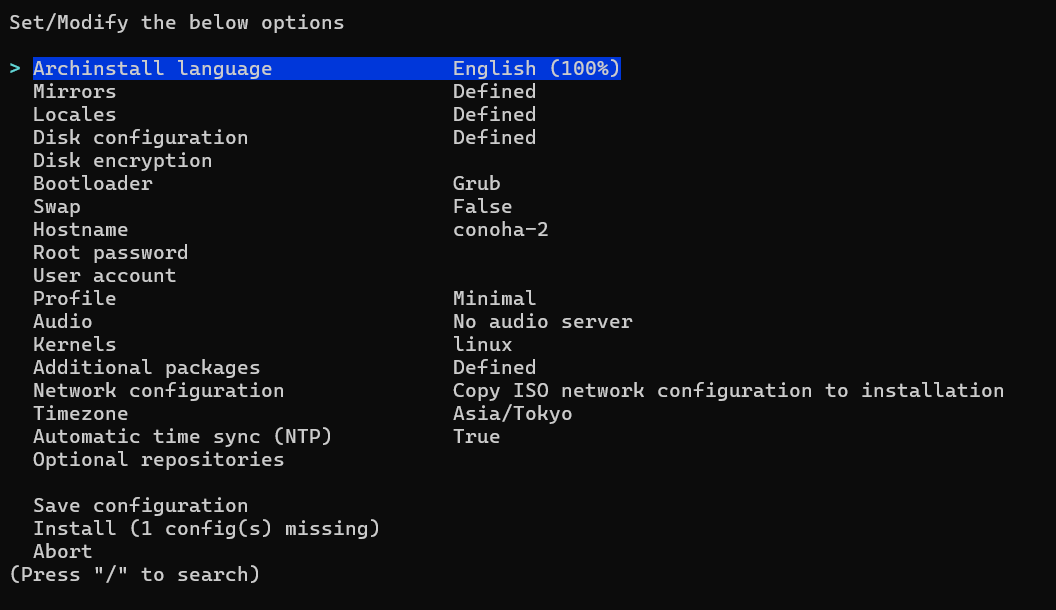
あとはアカウント情報等を設定しインストールすれば良い。
Conoha VPS に ArchLinux をインストールする
Conoha VPS に ArchLinux を入れたくなったため、インストールしてみる。 対象は Conoha VPS Ver 2.0 である。
ISO イメージの転送
ここを参考に ISO イメージを転送する。 リージョンは各種エンドポイントの URL から判別する。
ArchLinux の ISO イメージのダウンロード指示を出す。
./conoha-iso download -i https://ftp.tsukuba.wide.ad.jp/Linux/archlinux/iso/2024.07.01/archlinux-2024.07.01-x86_64.iso
しばらくするとイメージが見えるようになる。
./conoha-iso list
[Image1]
Name:  archlinux-2024.07.01-x86_64.iso
Url:   https://ftp.tsukuba.wide.ad.jp/Linux/archlinux/iso/2024.07.01/archlinux-2024.07.01-x86_64.iso
Path:  /mnt/isos/repos/tenant_iso_data/XXXX/archlinux-2024.07.01-x86_64.iso
Ctime: Mon Jul  1 18:10:53 2024
Size:  1173389312
VPS に ISO をアタッチする。
./conoha-iso insert
[1] XXXXX
Please select VPS [1-1]: 1

[1] archlinux-2024.07.01-x86_64.iso
Please select ISO [1]: 1
INFO[0007] ISO file was inserted and changed boot device.
インストール作業
VPS を起動する。

ArchLinux の ISO イメージからブートした。
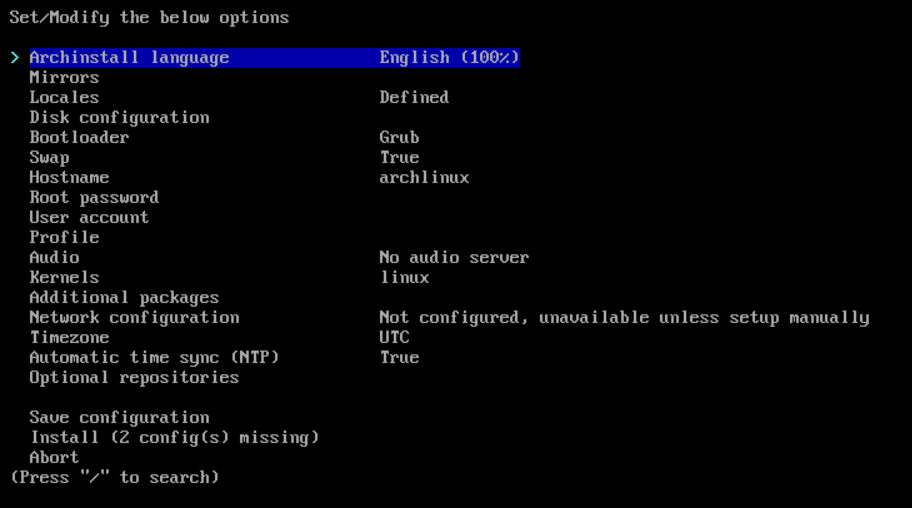
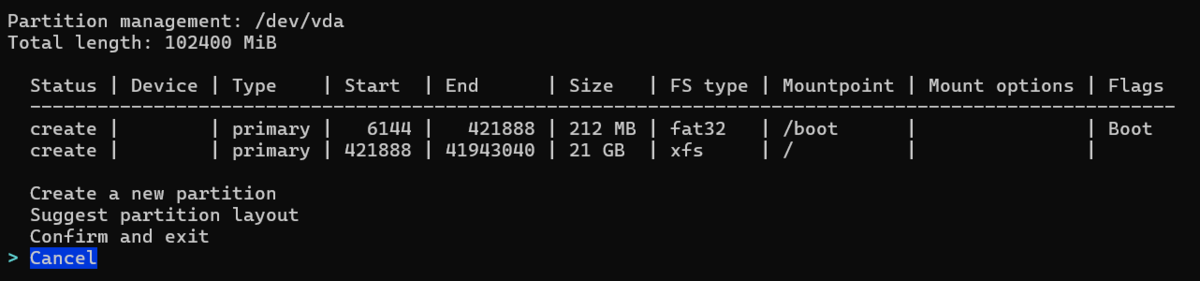
ネットワークについては、すでに DHCP で外部へ疎通可能な状態になっているため、そのまま archinstall でインストール作業を進める。
ディスクレイアウトについては空きパーティションを作る形にしている。
Profile は Minmal、それ以外は適当に設定し、以下のようになった。
インストール後、VPS をシャットダウンし ISO イメージを eject する。
./conoha-iso eject
[1] XXXX
Please select VPS [1-1]: 1
INFO[0002] ISO file was ejected.
VPS を起動し、必要なパッケージ類とネットワーク設定を投入する。 なお、今回は privaet network のインタフェースを割り当てているため、固定IPアドレスを設定している。
sudo pacman -S vim openssh
sudo systemctl enable --now sshd
cat /etc/systemd/network/15-private-ens4.network
[Match]
MACAddress=XX:XX:XX:XX:XX:XX
Name=ens4

[Network]
Address=192.168.20.2/24

sudo systemctl restart systemd-resolved
以上で簡単な設定は完了である。
